
It’s no secret that adding closed captions and subtitles to your YouTube videos gives you a competitive advantage over other YouTubers. Closed captions and subtitles improve your content by:
- Helping you grow your channel & reach a global audience (subtitle services translate your videos)
- Providing a way for the hearing impaired to enjoy your content
- Allowing individuals to consume your content in atmospheres that call for “silencing devices” (e.g. meetings, plane rides, etc.)
- Improving video SEO by providing more context to video search algorithms, and thus more rankings on YouTube video search
- Improving video accessibility for everyone, especially deaf and hard of hearing individuals
- Increasing video watch time
With all of these benefits, adding subtitles & closed captions to your YouTube videos is a no-brainer. This begs the question, “what is the best and most convenient option to add subtitles to YouTube videos?”
How to add closed captions and subtitles to YouTube with the Rev YouTube integration
Since YouTube is the number one video platform, Rev offers an easy-to-use YouTube integration. The benefit of this integration is you don’t have to do any of the captioning yourself, you can place your order in a matter of seconds, and you can rest assured your captions and subtitles will be accurate. Rev uses human professional captioners and subtitle translators for all YouTube video captioning.
Here is a quick step-by-step on how to order captions and subtitles for your YouTube videos with Rev.
1. Go to Rev Closed Captions page or the Rev Foreign Subtitles page and click “Get Started”
You can find the Rev Closed Captioning page here.

2. On the “Order Captions” page, click on “YouTube”
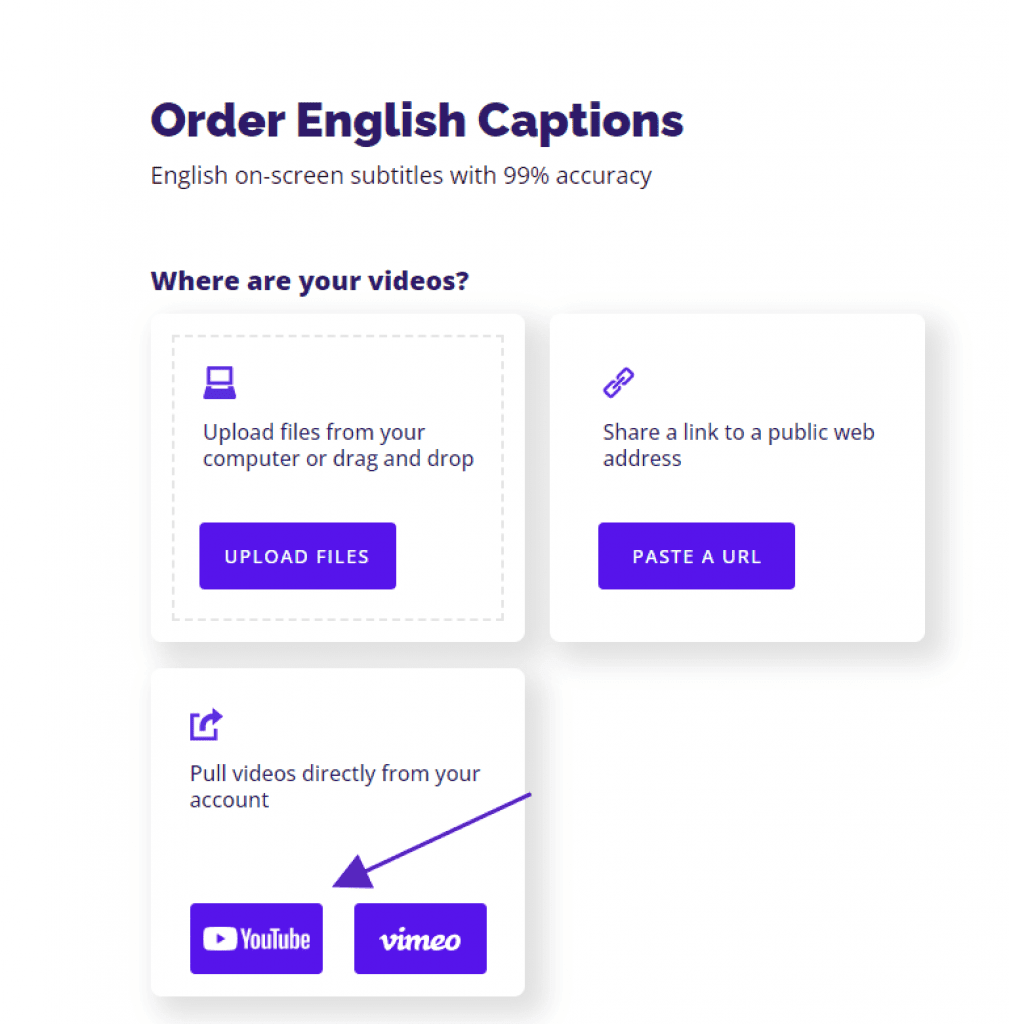
Pro tip: You can also upload a file or paste a YouTube video URL in this step.
3. Select the YouTube video you want to add subtitles or captions to and click “add selected to cart”
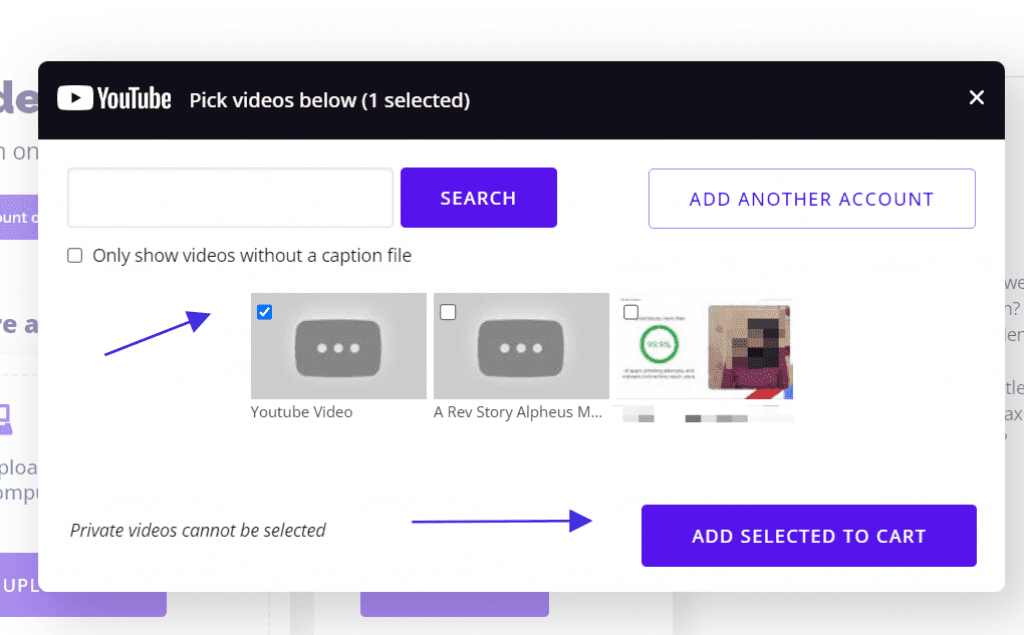
4. Rev will preselect the “automatically deliver files back to YouTube” box and allow you to finish the checkout process

Once you have finished the check out process, you can order your captions or subtitles and Rev will do all the heavy lifting for you. Your caption turnaround time will depend on the length of the video, but it is usually within 24 hours.
What are all of the ways to add captions to YouTube Videos?
When it comes to adding closed captions and subtitles to YouTube videos, you have three options, including using the YouTube Caption Editor, DIY captioning, and outsourcing. Let’s talk about the advantages and disadvantages of each option.
1. YouTube Auto-captions and YouTube Studio
YouTube has a feature that will automatically generate captions for videos using speech recognition technology. While this tool is certainly an option, it’s critical to remember the automated captions have low accuracy, and you’ll have to do a lot of editing within YouTube to make your captions make sense.
YouTube also announced they are ending community captions & community contributions due to problems with spam & abuse, so this is further complicating things for video creators.
If you want to edit captions or subtitles in for your YouTube account, you’ll have to log in to YouTube Studio to make changes. Here are the steps to follow in your account settings:
- Make sure you are the owner of the YouTube video.
- Sign in to your YouTube account and navigate to YouTube Studio.
- Select “Subtitles” from the menu.
- Click on the video you want to edit.
- Turn your attention to the “Subtitles” column and select “Options.”
- Click “Edit” on the top right of the screen.
- Click on the caption track you want to edit.
- Click inside any line in the caption track panel and edit the text.
- Click “Publish.”
Editing captions and subtitles within YouTube is an option, but it can also be time-consuming and requires accuracy on your part.
2. DIY captioning
Another option for adding captions or subtitles to your video is to do it yourself using a free or paid tool such as Subtitle Horse or Amara.org. Typically, these online tools work by asking you to upload a video and using a captioning tool while you watch and transcribe the video.
The advantage of these tools is they are free. The drawback is it is extremely time-consuming to use these tools and do all the transcribing yourself. Not to mention, if you’re adding subtitles, you’ll have to be proficient in your target foreign language–proficient enough to make your subtitles understandable and error-free.
3. Outsourcing captioning and subtitles
The third and preferred option is to outsource the closed captioning and adding of subtitles to YouTube videos. Services like Rev.com provide instant access to trained, high-quality transcribers, captioners, and translators.
Rev is affordable, provides a quick turn-around, and provides 99% accurate captions.
Let’s take a closer look at how you can add closed captions and subtitles to YouTube videos with Rev.
Prefer open captions? Rev now offers burned-in captions (open captions). Just check the “burned-in captions” box at checkout and you’ll receive a video with permanent, hard-coded captions added straight to your videos that can be viewed in any video player. Also available for foreign language subtitles!

What are the benefits of using the Rev YouTube integration?
Not only are videos captioned by human professionals but those captions are uploaded directly to your video the second they are done, eliminating a lot of time-consuming admin work.
Rev is also an official third party captioning tool for YouTube.
Authorize your account with our integration to pull videos from your YouTube channel to Rev for captioning. Or, for an added peace of mind, check the sync option setting in your account and we will automatically caption any new videos you upload to your YouTube channel. The majority of videos we caption are delivered back within 24 hours and our integration sends those .srt files (caption files or subtitle files) back to YouTube and adds them to your video.
Captioning on more video platforms


