The Rev Transcript Editor, a Guide for First Time Users
The Rev transcript editor is built to deliver insights beyond the transcript, for you and your team. Want to learn how to take your transcription workflow to the next level.

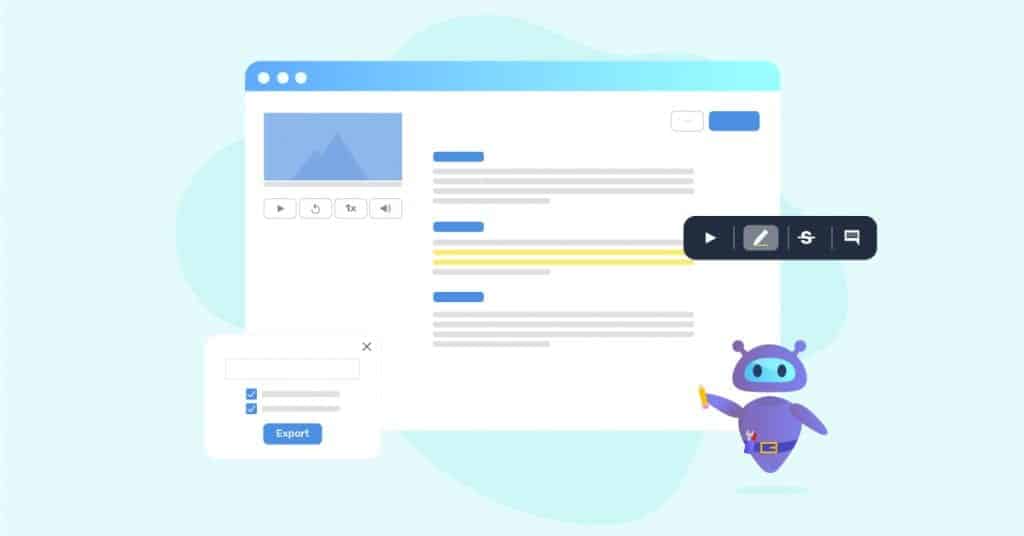
With the right tools, transcripts can be more than static text. We believe that a transcript should be an interactive product that aligns with our customers’ workflow. For us, that means building a suite of powerful tools that enable Rev subscription customers to review, notate, and collaborate — all in one easy to access editor.
This is the Rev Transcript Editor. Built to deliver insights beyond the transcript, for you and your team. Want to learn how to take your transcription workflow to the next level? Read on!
Note that you need to be subscribed to Rev’s services in order to use the Transcript Editor.
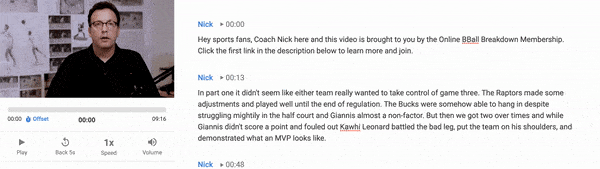
Embedded Media Player, with Read-Along Tracking
Listen or watch the source media, review & edit your transcript to perfection, but most importantly, never lose where you are in the text.
The Editor’s embedded media player syncs the video or audio up with the text in the transcript, making it incredibly easy to follow along as you compare what was transcribed to what was actually said.
All you have to do is:
- Hit the play button, or press [tab]
- Follow the blue highlight cursor, which overlays each word in the transcript as it is heard in the media file.
- Jump around the media by clicking around the transcript, or follow the tracker as you scrub the media scrub-bar.
Our transcripts are 99% accurate, and we make it painless for you to get to 100%.
If you don’t want the read-along tracking feature enabled, you can always turn it off by unselecting it in the ellipses menu located at the right side of the menu bar.
Sharing & Collaborative Editing
Easily share your transcript with your clients & your team, control read & write access, and work collaboratively to pull the insights you need – all in one centralized, up-to-date document.
We understand you don’t just work alone – many of our customers work in teams or with clients to collaborate on selecting specific quotes or to discuss materials. The Rev Transcript Editor allows all your collaborators to review & edit out of a single source of truth. No more worrying about which Word file in your email inbox has the latest edits.
You can easily share your transcript from within the Editor in just three simple steps:
- Click the Share button in the top right of the Transcript Editor
- Select read-only or write access permissions
- Generate a shareable link, or send an invite via email
That’s all it takes!


Highlights and Strikethroughs
Some quotes are worth more than others — highlight what you want to keep, strikethrough what you don’t.
These two features make it possible to select important details and quotes from a transcript with the following simple actions:
- Select the text you want to highlight or strikethrough.
- Press the highlight or strikethrough button in the selection toolbar.
- Observe the highlights or strikethrough in the transcript body.
Jot away — much like taking a pen to scribble notes on your paper documents, the Rev Transcript Editor allows you to the same for your digital transcripts.
Comments & Notes
Transcripts contain thoughts, reminders, and ideas. You should call out those insights.
Oftentimes, customers want to make some notes about their transcript without making any edits to the actual transcript text. To make this easier, the Transcript Editor has two features for you:
- The Comments button is located on the text selection toolbar. Simply select any text that you want to attach a comment to (à la Google Docs), press the comment button, and type your comment. This will leave a gray highlight over the text you left a comment on, and clicking on the highlight will allow you to view, edit, or delete it.
- The Notes Box is located to the left side of every transcript, where teams can add notes that relate to the entire file.
Here are some common use-cases:
- Gather & categorize examples and quotes for later use
- Help jog the memory with a note-to-self
- Leave an instruction for your teammate
Who needs to use other office software when you can use the Transcript Editor as your team’s hub for collaboration and communication?

Timestamps
Know exactly where you are in the transcript, so referencing location can be that much easier.
If you’ve paid the extra $0.25/minute to include timestamps in your transcript order, the Transcript Editor allows you to view them on every word – down to the second.
Simply highlight any word in the transcript to surface the selection toolbar. On the selection toolbar, you’ll find a play button labeled with the timestamp of that location. Pressing this timestamp play button will play your media beginning one second before, so you can hear that word in context of the phrase or sentence. You can also view timestamps at the beginning of every speaker monologue, located next to the speaker name.

Ratings & Feedback
The more your rate, the better the quality of your transcripts get!
We’re constantly striving to improve our world-class transcription quality, but did you know you can help too? It starts with leaving a rating out of five stars for your files in the Transcript Editor.
- For ratings 3 stars or less, our Quality Team will review your file & take action to ensure it meets our quality standards. We’ll also restrict the transcriptionist from working on your files again.
- For ratings 4 stars or more, we’ll forward feedback to the transcriptionist so they can keep improving.
In the long run, everyone wins – so give files a rate!

Exporting
After you’ve finished reviewing and editing, take your transcript into the next step of your workflow.
When you’re ready to export a final copy of your transcript, the Transcript Editor gives you options to do so in the way that you prefer. To Export your transcript, simply select the Export button in the Ellipses menu on the right side of the menu bar, and customize the following options:
- Remove speaker name, timestamps.
- Only export highlights.
- Download in different file formats, including Word, PDF, and .txt files.
Your data is not captive — set your transcripts free and integrate Rev into your extended workflow.

Other Tools
We’ve built many more tools to help you stay productive when reviewing your transcripts, you can find them below.
Find and Replace: We make it easy to find keywords in your transcript and replace them individually or all at once.
- Click the magnifying glass icon on the top left to display the search bar.
- In the search box, type the text that you want to find.
- Any instances of the found text will be highlighted and can be replaced easily.
Speaker Name Change: Need to make quick edits to the speaker names?
- Hover over the speaker name and click on the edit icon.
- Make changes either to a specific name or apply the changes to all the names in the entire transcript.
Make changes either to a specific name or apply the changes to all the names in the entire transcript.
Custom Start Time: Some timestamp customers need to add a manual offset to adjust the transcript timecode to match the burnt-in timecode, for ease of video editing and production.
- Click the offset button next to the start-time underneath the video.
- Set a new start time.
- Instantly see the timecode changes in the transcript and media player.
Shortcuts: Lastly, we understand our customers’ need to quickly navigate the transcript along with the media player and we help support that with hotkeys. With shortcuts that enable play, pause, and skip back in the media player, customers can easily review their transcript with audio without moving back and forth between the text and the media player. Highlight and strikethroughs can also be done efficiently with shortcuts.
- Click the ellipses button located on the right side of the menu bar.
- Click the Shortcuts button to view all the available shortcuts
What do you think?
As a team with a customer-centered approach, we spend a lot of time talking to users about what sort of features would improve their transcript workflow.
Most of the features detailed above have stemmed directly from conversations with customers.
Have suggestions or ideas for a new transcript feature? Don’t be shy — let us know.