How to Edit Any Video in iMovie on Your Mac
Apple's Mac computers come with iMovie, a free video editing software. Learn how to edit videos in iMovie on your Mac computer.

Once you open up iMovie, the free video editing software on your Mac, you will be able to create three kinds of projects: Media, Projects, Theater, found on the top bar.
- Media: here is your library of different footage clips, stills, and audio to create your videos; for ease of use photos have a camera icon and audio tracks are colored green
- Projects: this is where you work on creating your movie: the main workspace
- Theater: here are your finished projects – you can play them, or use the little icon on the lower right to play, delete, rename or remove them from the cloud storage. You can also distribute it from here, we will come back to this later
1. Prepare the Project Workspace
When you click Project, two options are available: Movie and Trailer.
Trailer is a fun way of creating a little teaser for a movie or combining short clips. It prompts you to create a satisfying short video using templates.
In this article, we are going to look at the Movie method of editing video. These basics apply to Trailer too, and if you have accomplished them, making trailers will be quite easy.
Click on Create New > Movie.
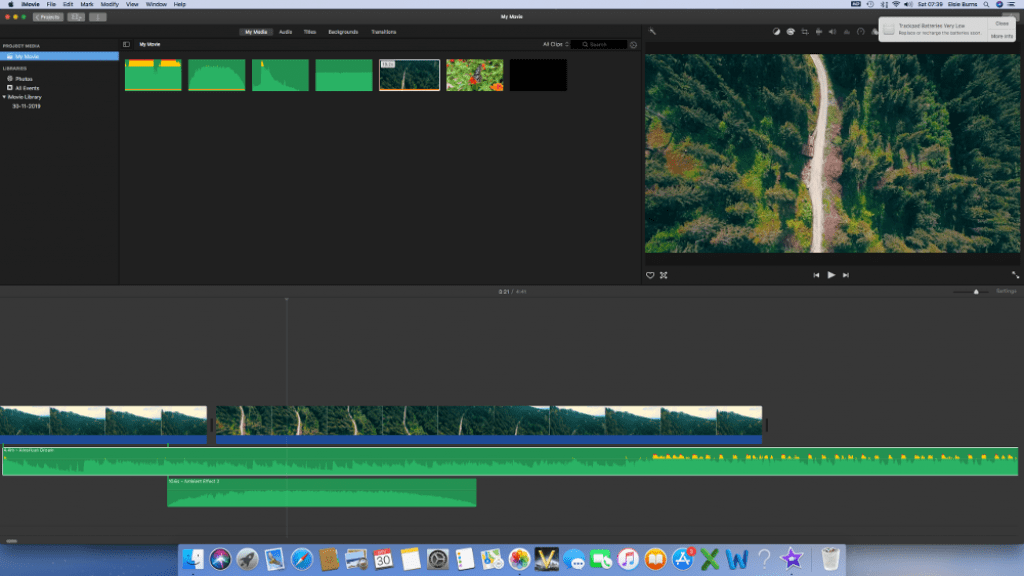
This will take you into the Project workspace. Video editing consists of a Timeline, which is the film going from left to right, with tracks for visuals and audio. There is also an area for media, and windows for playing either the clip or the edited sequence.
The media are your building blocks. The timeline is where you edit visuals, sound, music, effects, and titles to make a satisfying video. iMovie is quite easy for beginners to use.
Drag and drop your media into the timeline to create your video. You can move them around and rearrange by dragging.
Modern video editing is “non-destructive”, that is you can play around with everything to your heart’s content, without ruining the originals, so you can go back if you do something you don’t like.
Cmd+Z undoes the last action.
Boost Video Engagement: Add Captions to iMovie
2. Cutting Video Clips
You can see each clip in the Preview window (or panel). Hitting the space bar plays/stops playing the clip or you can drag the mouse across the timeline to where you want to be.
iMovie editing tips: most clips won’t be the right length. You can edit visuals (still or moving), audio, or music independently. You can also trim clips to the exact duration needed.
How to split a clip in iMovie
You often want to remove the beginning or end of a clip. It is an old rule-of-thumb in film-making to start the camera rolling early and finish late so you capture all the action. That means there is excess to trim in the editing stage.
Move the vertical line with the mouse to where you want to edit, right-click to split the clip into two. Then you can press delete to remove it. You can scrub around in the preview window to find the exact place to cut.
Audio clips can be edited in exactly the same way. You can use the Settings slider to zoom in and out on the timeline. The audio shows the sound graphically. If you look carefully you can see where a particular sound finishes. For example, if you have an interview with someone, and you have asked questions, you can cut them out so the person just appears to be talking continuously.
Editing Videos in iMovie on iPhone or iPad
This article has covered the basics of editing using a laptop or desktop mac. You can also edit videos using iMovie on the iPhone or iPad mobile apps. It is very similar to the way that you edit on your desktop, although some of the methods have been streamlined to make it easier to produce a movie using these platforms.
3. Add Music to iMovie
You can’t really do without music. If you are making a simple movie about your holiday, you might want to get some stock background music (Apple includes various tracks in iMovie). Simply lay that in an audio track. You can fade in and out by dragging on the beginning or end.
Note: if you are making a more complex production – for example with interviews or voice-over – you should not let the music overwhelm the audio. Fade it under the narration – it is actually better to err on the quiet side. Viewers find it quite annoying if they can’t hear what is being said.

4. Add Transitions to Video Clips
These are where two clips merge into each other. In the Transitions menu (on the top bar) you can find plenty of fun ways to go from one visual to the next. All you have to do is drag them into your movie at the appropriate place on the timeline. Note that lots of flashy transitions can become quite irritating to the viewer. The ordinary cut is the standard way. Transitions can be particularly effective when used with titles to introduce the video.
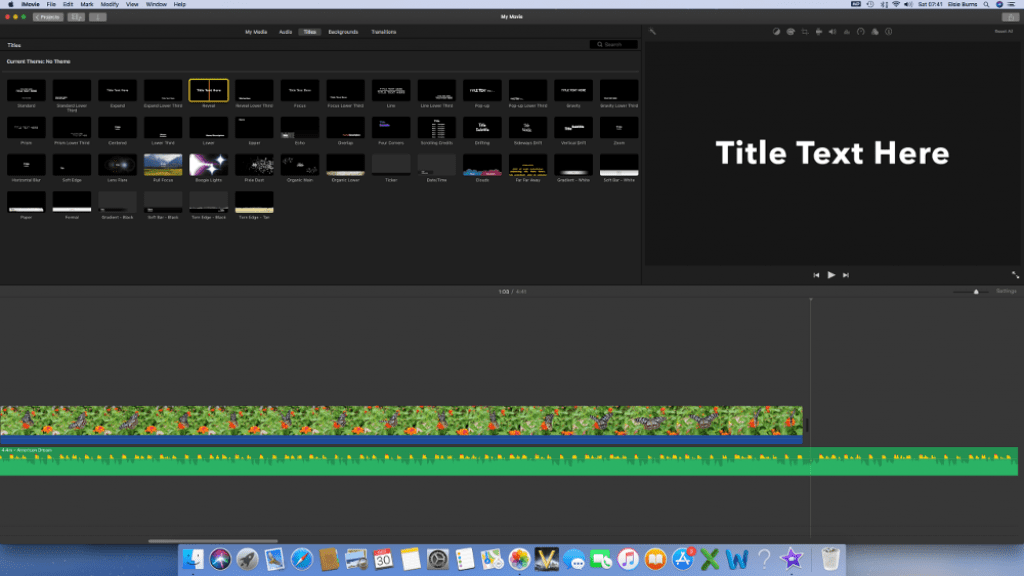
5. Add Titles to Project
Probably the first thing on screen in your film will be the title sequence. This is where you let your audience know that they are going to see something interesting, so think about them carefully. A good title, even if it lasts only a few seconds, primes the viewers for the film.
PRO TIP: People often watch videos on social media with the sound off, and many viewers are deaf or hard-of-hearing. Rev closed-captioning is a service available to produce subtitles for iMovie projects.
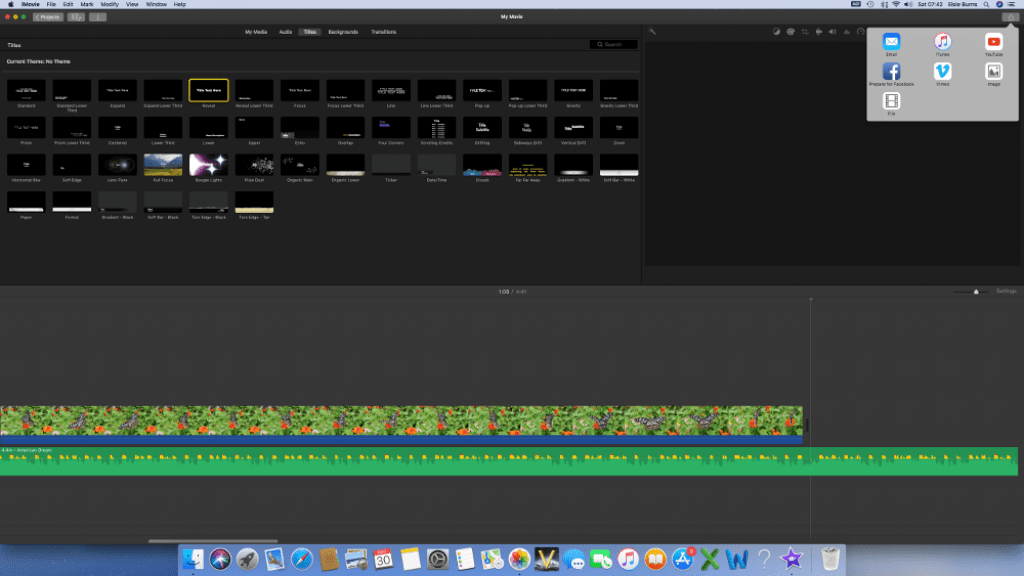
6. Export Your Project in iMovie
Once you have finished your project and viewed it through a couple of times to check everything is OK, you can go to the very top right-hand corner of the screen and there is an export icon. This allows you to finalize your video for Theater, Email, iTunes, YouTube, Facebook, and various others.
If you plan to put it up on YouTube, click on that icon and a panel comes up which lets you set various parameters of the film, such as description, resolution, and category. Private means only you can see it. You may want to ensure it is ready in your channel before you make it public and distribute it to the world.
If Theater is checked, then it will automatically add it to your Theater and the iCloud.
When you click Next you will be prompted to log in to your YouTube account and upload the movie. That’s all, folks!
Add Captions and Subtitles to Your iMovie Projects
Although Apple doesn’t currently support importing caption files directly into their free editing software, you can add titles in iMovie with your captions files, or you can add forced subtitles to videos exported from iMovie.
With either method, you’ll want to have Rev produce your captions files. It’ll save you time and reduce the headache of formatting your own SRT file. Plus, you can use it on platforms like YouTube, Facebook, and Vimeo!

