How to Add Subtitles to a Video on iPhone
Videos are all the rage right now. Not only are they a great way for brands to showcase their latest and greatest products, but short videos tools to help amateur videographers fine tune their craft. We’ve even seen a video clip as another way to communicate with family and friends over social media.
Looking to add subtitles to a video on a different device? There are several more software options for captioning and subtitling on desktops.
These days, most people use their iPhones for everything – from communicating with their network, to browsing the news, to recording audio and video content. Why not learn how to add subtitles to a video and make even more use of your content?
Keep reading to learn why subtitles and captions are so important, how Rev helps you get captions and subtitles fast, and how you can use iPhone apps like iMovie to add subtitles to a video yourself!
Why is Adding Text to Video so Important?
If the video you produce isn’t accessible, it could be obsolete to viewers who are hearing-impaired or watching with the sound turned off. Add subtitles to a video, and it will automatically be relevant to a much wider audience.
Subtitles are the text that run along the bottom of the screen during a movie or tv scene that depict the spoken dialogue, significant noises, and music. While they first became popular from translating foreign films, subtitles are showing up more in social media videos. Why? 85% of Facebook videos are viewed with the sound off. Without subtitles, those viewers are missing the best part of your content. Plus, videos with subtitles often see a 14% increase in viewer engagement – who wouldn’t want that?!
Using Captioning and Subtitling Services From Rev
To add subtitles to a video without learning any advanced editing tools, you can use an on-demand transcription and captioning service and let the professionals help you.
The first thing you’ll need to note is – are you looking to add subtitles to a video, or captions?
- Captions include background noises, speaker differentiation, and other relevant information, making content more accessible for individuals who are deaf or hard of hearing. They also come in two forms: open and closed.
- Subtitles, however, assume viewers can hear the audio and are typically used when the viewer doesn’t speak the language in the video – think of watching a foreign film where the dialogue is in a language you don’t speak.
Lucky for you, Rev can help with both! When adding closed captions to your videos, Rev has two services you can take advantage of: captioning services and global subtitling services. Both will not only expand the audience of your video, but they also boost search rankings, discoverability, and viewer engagement.
Steps to Add Captions to a Video Using Rev
Follow the steps below to learn how to add captions to your next video using Rev.
1. Visit Rev’s website
The simplest, fastest, and most accurate way to add subtitles to a video is with Rev’s AI captioning services. Simply visit the Captions checkout page and select your service.
2. Upload your video file
Rev accepts a variety of file types for adding subtitles to a video, as well as captions. Simply upload the file directly to Rev, paste the URL, or connect your YouTube account to select a specific video.
3. Choose your preferred file format
Just as Rev accepts several file types, we’re able to provide captions and subtitles in a variety of formats. Simply select from the dropdown options under “Output File Format(s)” and choose your preferred one.
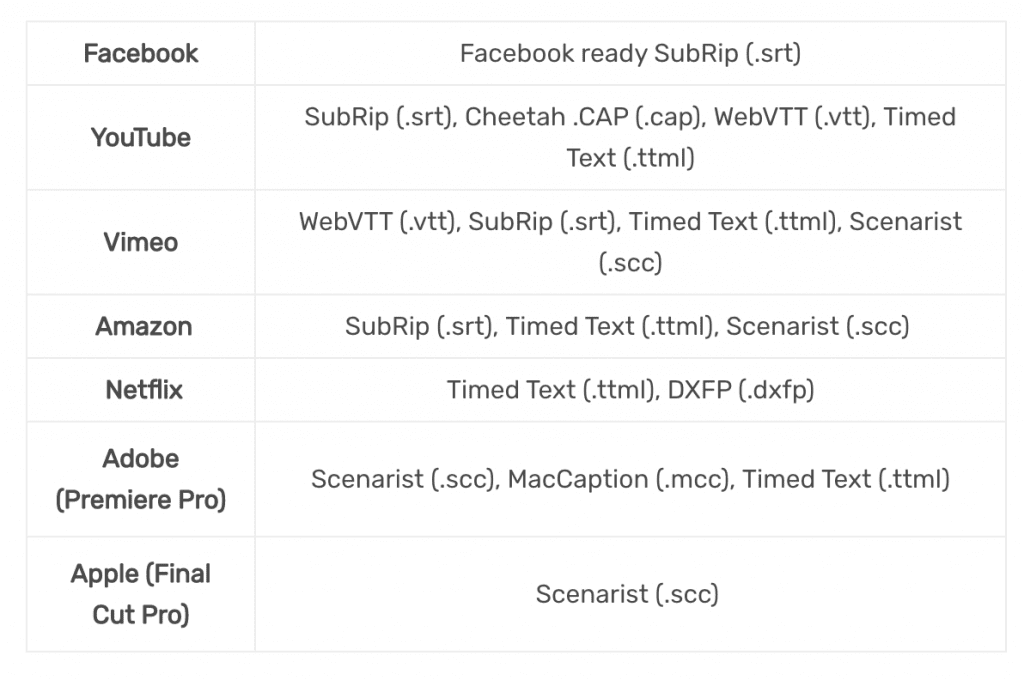
See the table below for the preferred formats of several popular video platforms. Also consider using “Burned-In Captions”, which is much easier on an iPhone.
How to get captions added directly to your video
Prefer not to deal with caption files? Rev now offers burned-in captioning services (open captions). Just check the “burned-in captions” box at checkout and you’ll receive a video with permanent, hard-coded captions added straight to your video. Also available for foreign language subtitles!
4. Click “Checkout”
Rev’s turnaround times for captions and subtitles are as follows:
- Human Captions: 24-hour average turnaround time
- AI Captions: Get AI-generated captions delivered in minutes
- Subtitles: 48-hour average turnaround time
5. Download your caption or video file
The easiest way to get your videos fully captioned is to order “Burned-in captions” at checkout (see step 3). Then Rev will send you a video file with your captions already on your video.
If you want to add your caption file to the video yourself, we recommend doing this on a computer, because it will be much easier.
How to Add Subtitles to a Video Yourself
This will take a little more time if you have a long video, but you can add subtitles to a video, as well as captions, yourself. To start, you’ll need to download the iMovie app. A quick search on the Apple App Store for iMovie will allow you to install the latest iMovie app for free. The storage space for this app is 700MB so it’s important to make sure you have enough storage space on your phone before downloading.
Once iMovie is installed, it’s time to start playing around and using this fun tool so you can add subtitles to a video. While there are a variety of advanced editing tools you can learn and do through iMovie to add to your video, let’s focus on one of the most important aspects: text.
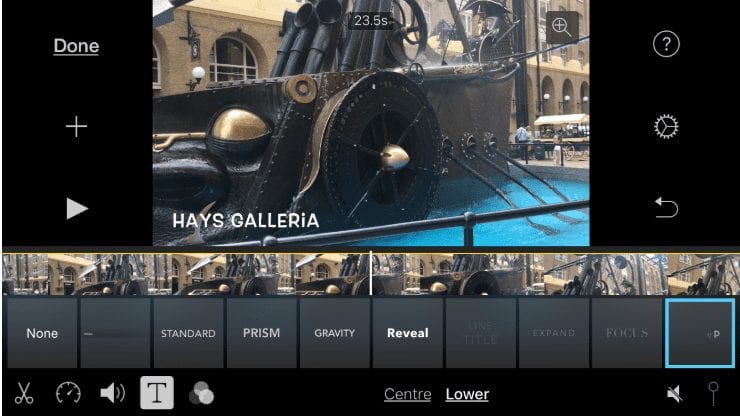
Whether you create a movie or trailer (the two template types available in the app), it’s pretty straightforward to edit your clips to add text in the iMovie app. Here are the steps:
- Tap on the clip you want to edit in the timeline. How do you know you’re in editing mode? A yellow outline will appear around the entire frame of the clip.
- From there, tap on the T icon. Once you do that, you’ll see a variety of different styles appear. Each will have a different font size and animation associated with it.
- Tap on each to preview what the text looks like so you can select the right style for your video.
- Once you’ve selected the right style, simply type out the text for that particular clip.
- Select where your captions will be displayed: across the middle of the screen or in a lower corner.
- Play the video to ensure your subtitles are accurate.
- If you notice a misspelling or wrong word, it’s easy to edit it. You’ll have to go back in edit mode, select the clip, and tap on the T icon.
- When you’re satisfied with your subtitles and creative efforts, tap done. From there, you can share it (the share button is a square with an arrow pointing out of it) on your social media channels or send it to your family and friends.


Subscribe to The Rev Blog
Sign up to get Rev content delivered straight to your inbox.