Zoom Online Teaching – How to Use Zoom to Teach Classes
With online teaching becoming the norm, you may need to know how to lead an online class. Read on for some zoom teaching tips from Rev.
With so many people using Zoom for teaching classes and hosting meetings online, it’s important to know how to use the platform properly, and how to make the most of its features.
Whether you’ve never used Zoom before or want to improve your online lessons, we’ve put together some answers to all your zoom questions, as well as some tips and tricks for students and even a free downloadable Zoom teaching checklist.
How to Sign Up for a Free Zoom Account
First things first, you’ll need to get set up on the platform:
1. Start by going to http://zoom.us/ and sign up for a free account by entering your email address
2. Click the activation email from Zoom
3. Fill in the form with your name and password
4. Once you have an account, download Zoom onto your computer
How to Schedule a Zoom Meeting for an Online Class
Once you’ve made your account, you can start scheduling meeting for regular classes and calls:
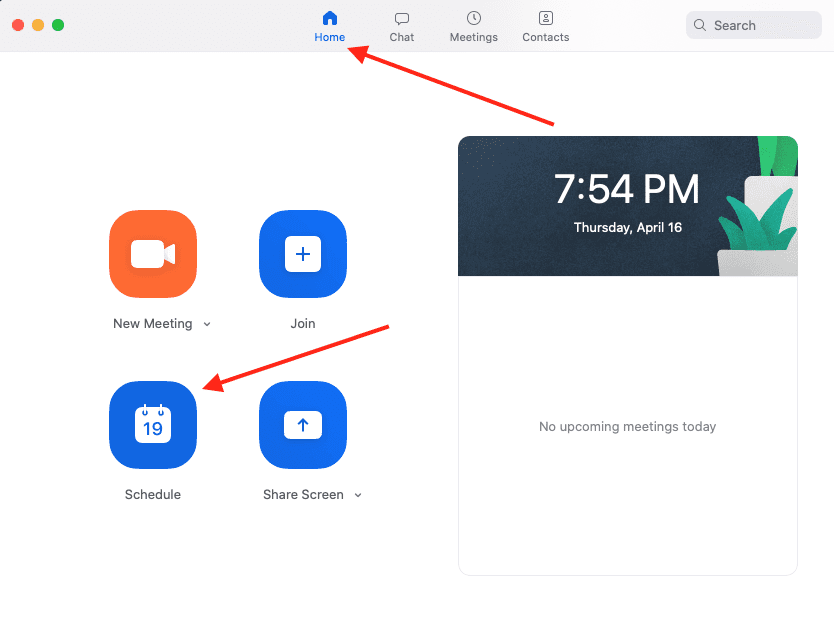
1. Open the Zoom Desktop app on your computer
2. Click “Home” at the top left
3. Click “Schedule”
4. Enter all relevant details like time, date, topic, etc.
You can then pick your online calendar of choice (Google Calendar is great if you have Gmail or a Google account), and you’ll be taken to a page with your Zoom link. You can send this link to your students in your online calendar meeting scheduler.
If you want to book in a regular meeting, select the ‘Recurring Meeting’ option when scheduling the call. Set the recurrence to ‘No Fixed Time’ to make sure it happens at the same time each week/month. You’ll then have a reusable link that you can share around. Learn how to manage your calendar with our guide.
How to Share Your Screen on Zoom
Screen sharing is a great Zoom feature for presenting slide shows or resources to your class. Doing this allows you to share your computer screen with everyone on the Zoom meeting, meaning they can see the same presentation in real time. To share your screen:
1. Click the green “Share Screen” button at the bottom during your meeting
2. Click which screen you’d like to share (the top left one is what you’ll most likely use)

How to Enable and Create Breakout Rooms in Zoom
If you’re leading a discussion-based class, Breakout Rooms let you split your meeting into multiple sessions, similar to creating discussion in a live classroom setting. Students can have their own small groups within the Zoom call, allowing them to talk about the materials or share their opinions with their peers.
To create your breakout rooms:
- Log into your Zoom account and make sure breakout rooms are enabled (you can do this by flicking the toggle in the meetings tab within ‘Settings’)
- When you start your Zoom call, click the “Breakout Rooms” icon at the bottom of the screen
- Choose how many breakout rooms you want Zoom to automatically split your participants up in to (you can also manually sort people into rooms)
- Click “Create Rooms” to get the groups started
How to Use Zoom Whiteboards
Zoom Whiteboards are another feature that seems tailor-made for teachers. To get to the Whiteboard:
1. Click “Share Screen” at the bottom of the Zoom window
2. Then click “Whiteboard”You’ll then have access to a virtual whiteboard, ideal for complex classes and emulating the classroom when not everyone can be there.

Tips and Tricks for Zoom Teaching
Once you know how to use the platform, here are some simple tips to help you run your online lessons seamlessly:
- Run a practice meeting beforehand with friends or colleagues to test your speaker, microphone, and camera settings
- Use headphones/ a headset with a microphone to avoid echoes
- Make sure your meeting requires a passcode for an added level of security
- Take some time to familiarize yourself with host and co-host controls
- Set aside some time during your first class to introduce your students to Zoom and ensure that they’re able to connect their audio and video
- Check the chat often to see how your students are responding to the class and see if there are any questions
- Encourage your students to use the reaction buttons e.g. thumbs up if they understand everything
- Open up any resources you want to share before you start the meeting so you have them ready to go
- Share some online class or meeting etiquette tips with your students before the first class, e.g. stay muted when you’re not speaking
How to Add Rev Live Captions to Your Zoom Classes
To make your classes accessible, Rev now offers Zoom live captioning, which means all of your Zoom meetings will have live captions added to the bottom of the screen. Live captions are great for students who are deaf or hard of hearing, and they are often preferred by all students in online class settings to fully understand what’s being said.
There you have it! With these practical tips for Zoom teaching, you should be able to run your classes as smoothly as ever, even though everyone isn’t in the same room. Need to share your lesson with others? Try our transcription services to get an easy-to-share transcript of your online class.

Subscribe to The Rev Blog
Sign up to get Rev content delivered straight to your inbox.