


How to Host an Online Small Group and Virtual Bible Study
Here's all you need to know about how to host an online small group with video conferencing platforms like Zoom.


When you can’t get together with your church or bible study group, it can be hard. You may miss connecting with others to discuss scripture and grow. Unfortunately, with the pandemic, many gatherings are on hold. But you don’t have to give up your fellowship because you can’t meet in-person. Video conferencing platforms like Zoom can help you start an online bible study small group.
Never organized a virtual bible study before? Don’t worry. Here’s all you need to know about how to host an online small group to help you pull it off.
How do I host an online small group bible study?
You can host a small group online bible study in a few simple steps. First, find a platform like Zoom to host the meeting. Then, learn about meeting security, schedule the event, and invite attendees. Next, prepare your agenda, use the collaboration tools, and make the meeting accessible. Read on for a closer look at each of these steps.
Which platform should you use to host a virtual bible study?
When choosing a platform for small groups online, consider two main factors. First, how many people will you host? Second, which features do you need? If you’re inviting fewer than ten people and only need basic functions, like screen sharing and video conferencing, Google Hangouts may work for you. It’s free with a Gmail account, has a chatbox for sharing prayer requests, and has security measures to keep your meetings private.
However, Zoom is usually the better choice for virtual bible studies. It allows you to host more people and has collaboration tools. On Zoom’s free platform, you can invite up to 100 people to your meeting for up to 40 minutes. If you need extra time, you can easily create a new meeting or upgrade to one of Zoom’s paid plans. They start at $12.49 per month and enable groups to meet for up to 30 hours at a time— much more than you’ll likely ever need.
Zoom also has collaboration tools. For example, you can use breakout rooms to discuss bible passages in smaller groups. Another useful feature is annotation. It allows participants to write on a shared screen or whiteboard. These can help everyone in your online bible study small group engage with the material on a deeper level.
Safety tips for virtual bible studies
Unfortunately, there’s always a chance that a hacker could get into your small group online bible study and wreak havoc. To keep your meeting secure, make sure you set a strong password, and only share it with the people you want to invite. Don’t share the meeting invite details in a public place like social media.
Also, consider enabling the waiting room feature so you can see who’s trying to join before giving them access. It’s also a good idea to adjust your Zoom settings so participants can’t share files or their screens. This will prevent a hacker from sending inappropriate images or malware to the group if they manage to sneak in.

If anyone disrupts your Zoom meeting, you can remove them by clicking on “manage participants” in the host controls at the bottom of the screen. Hover over the name of the person you want to eject and hit “more” and then “remove.”
You can also prevent other troublemakers from joining once all participants join. Simply, navigate to the “manage participants” tab, click “more” at the bottom of the page, and select “lock meeting”.
How to host and invite people to your virtual bible study
Zoom allows you to schedule your next online small group bible study in a few simple steps.
First, open Zoom and hit the purple “schedule” icon in the bottom left corner of the home screen.
A new window will appear and prompt you to add the details of your meeting such as the topic, date, time, and password.
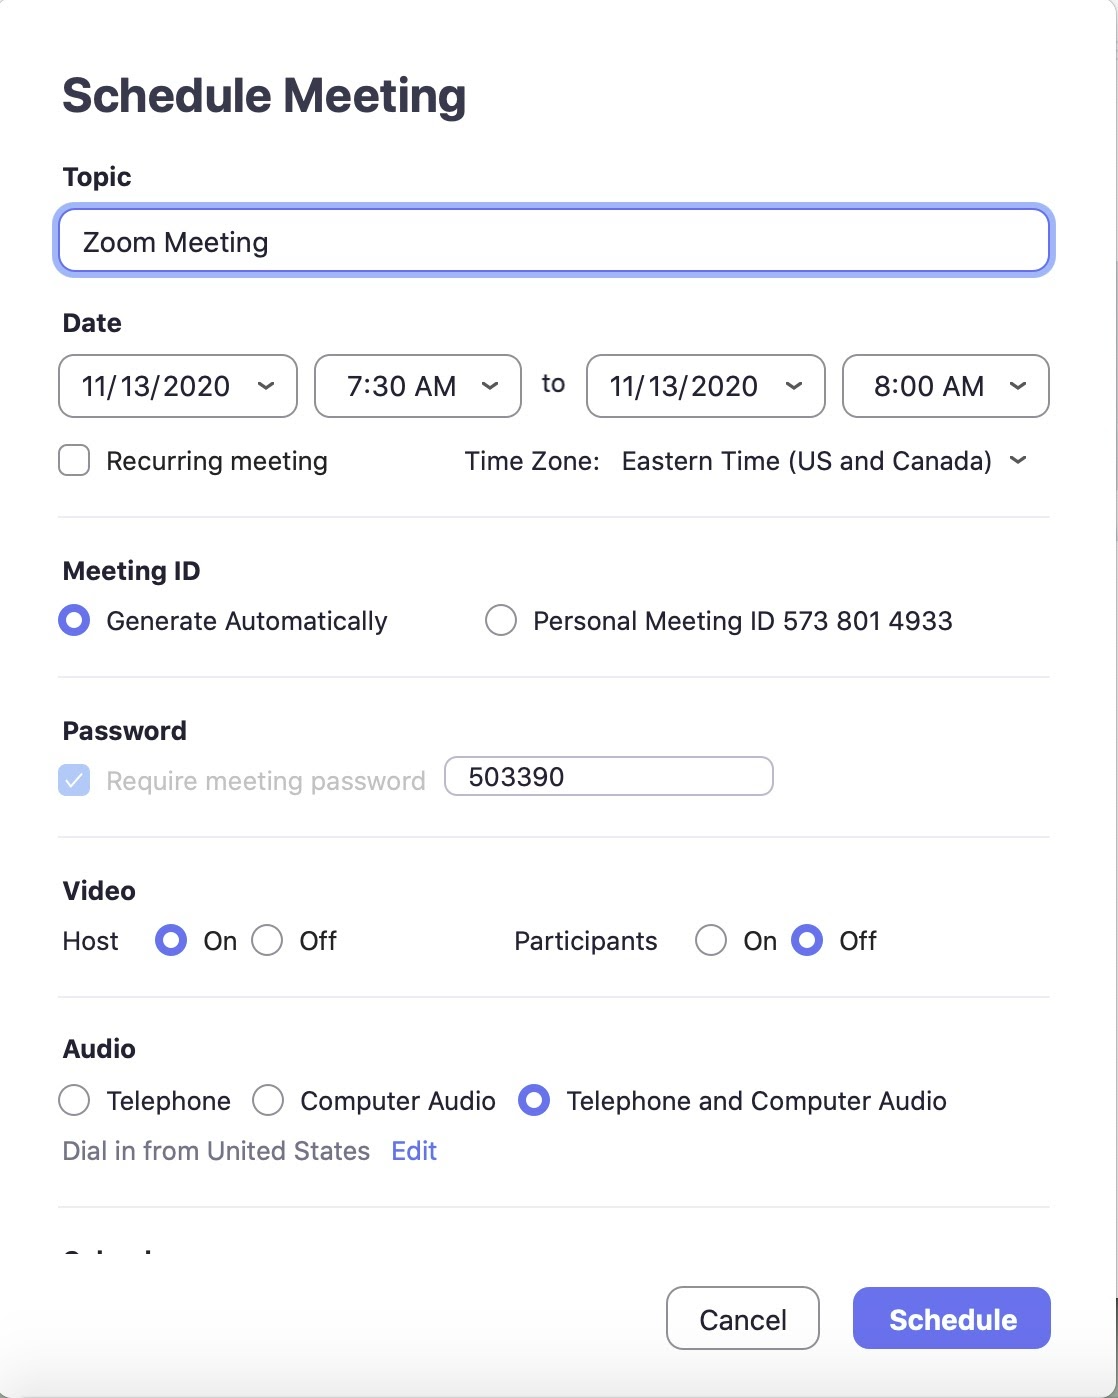
You can also select which calendar service you want to add your meeting to, such as Outlook or Google Calendar.
Once you’ve finalized these settings, hit “schedule.”
To invite people to your virtual bible study, navigate to the “meetings” section of the main toolbar.
Then, click the “copy invitation” button, which is about halfway down the page. This will allow you to paste the meeting details into an email and send it to anyone you want to invite.
How to show slides and videos in Zoom meetings
Zoom makes it easy to share important slides and videos with your participants.
All you have to do is pull up the PowerPoint or video you want to show. Then, hit “share screen” at the bottom of the meeting window.

Then select the window that you want to share from the pop-up menu.
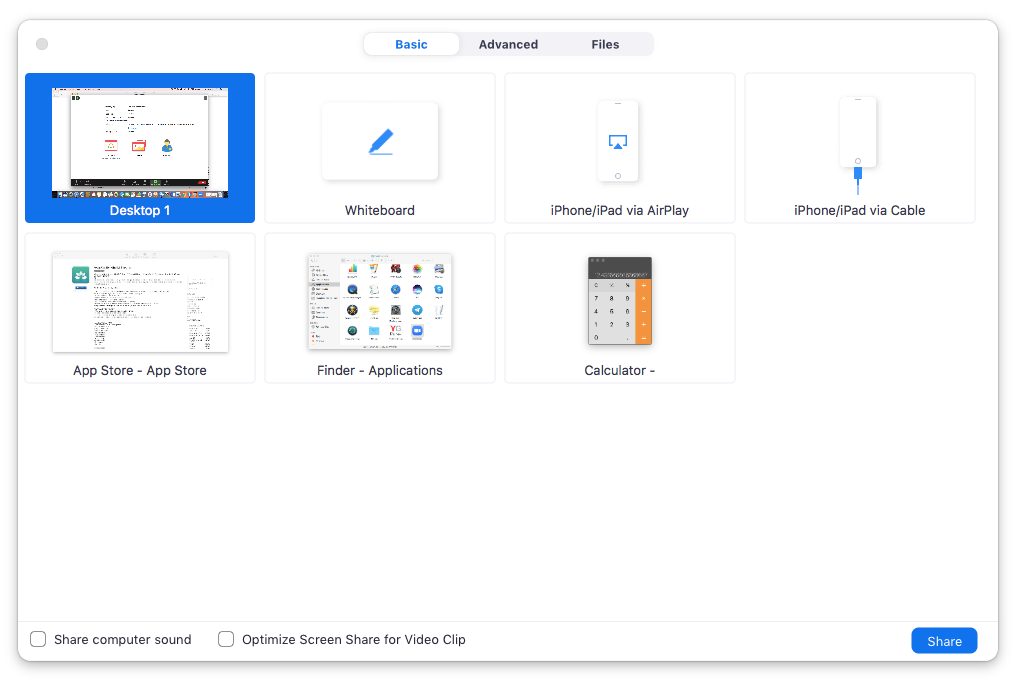
For presentations that have audio, make sure you check the box that says “share computer sound” at the bottom of the window.
If you’re showing a video, you’ll also need to select “optimize screen share for video clip.”
How to prepare for your online bible study small group
Organizing a successful virtual bible study requires some planning. Here are four things you can do before your meeting to ensure it goes off without a hitch.
1. Make an agenda
Planning an agenda ahead of time will help you stay on track during your meeting. Map out time for group members to catch up, for you to share lessons, for group discussions, and for prayer requests. You may also want to plan an ice breaker activity for the beginning of the meeting to help everyone get comfortable.
2. Email resources to participants
Videos, discussion questions, and online workbooks can deepen your understanding of the scripture and help keep everyone engaged. Pick a few online small group bible study resources to use during your meeting and email them to participants in advance.
3. Prepare your logistics
A few minutes before your meeting, set up your computer somewhere with minimal background clutter and good lighting. If you have one, wear a headset with a built-in microphone to make it easier for everyone to hear you.
4. Set ground rules
It’s a good idea to set some ground rules at the beginning of the meeting to ensure it goes as smoothly as possible. For example, ask participants to mute their mics to reduce background noise and raise their hands when they want to speak so they don’t talk over each other.
You may also want to select a co-host to help you moderate the chat so you can focus on teaching the lesson and leading the group.
How to make your virtual bible study accessible
Lastly, an important part of hosting small groups online that’s often overlooked is accessibility. In a regular Zoom meeting, non-native English speakers and people with hearing loss may have trouble keeping up. Further, some participants may be in an environment where they can’t hear well. Adding live captions to your meeting will make it easier for everyone to participate.
A new way to gather
Hosting an online small group bible study can feel overwhelming if you’ve never done it before. But once you get the hang of Zoom, it can come just as naturally as leading in-person gatherings. It may even be easier as you don’t have to travel and people can join no matter where they are in the world! Plus, you can record and save the meeting to share with others who couldn’t attend.
Learn more about how we integrate with Zoom.